The Group Filter widget allows you to apply a filter on the map based on one or more layers in the map. A set of layers are grouped into a logical filter set. Each set can have a predefined value to facilitate user interaction. This widget has two modes: normal, which allows the building of complex filters during run time, and simple, which only allows one filter to be applied.
Configure the Group Filter widget
This widget can be set to open automatically when
an app starts. To enable this feature, click the Open this widget automatically when
the app starts button  on the widget, which turns it dark
green.
The following steps indicate how to create a filter set. Repeat these steps if you need to define additional filter sets.
- Hover over the widget and click the Configure this widget button
 to open the configuration properties dialog box.
 - Optionally click Change widget icon to replace the default icon for this widget. A file explorer window appears, allowing you to choose a local image file to use as the widget icon.
The configuration displays one group that's ready to modify.
- Define a Filter Set Name.
The filter set name option, will be the name that a user will select from. Optionally, you can give a description to guide users on what this group will filter.
- Optionally use Preset Operator and Preset Value to define a value for this filter so that during run time, users do not have to supply these criteria. For Preset Value, you have the option to type a value or click the search button to choose a value from an existing layer.
- If you want to filter on different fields in the same layer, the When a layer is listed more than once, use the following operator between fields parameter controls how to join these filters using OR or AND.
- The table that is provided, display the layers to group together under the filter set. You should see one layer already populated by default with a random layer from your map. Choose the layer and the field to which you want to apply a filter.
- Select the Use Value button, this allows you to choose whether a value drop-down list appears for the user to find a value. If the option is not selected, a plain text box appears instead.
Note:
This button is optional.
- To add another layer to this filter set, click the Add Layer button.
- To add another filter set, click the Add a New Group button. This creates another filter set grouping. If needed, repeat steps 3 through 7.
- The following five check boxes control the way the widget behaves:
- Start in Simple View determines how the widget will appear to end users. Checking this box will remove the operator drop-down list and the Add Criteria button from the interface, giving it a more basic appearance.
- Hide Widget Options determines whether to show an icon to expose additional widget settings. These settings include saving and loading defined filters, appending to an existing filter definition in the map if it exists, and persisting the filter even after the widget is closed.
- If the web map has an existing predefined filter applied, Append Filter to Existing Web Map Filter Using OR or And allows you to decide if you want to override this filter or append filters created in this widget to the existing web map filter. By default, this widget will override the web map filter. Additionally, enabling this will persist filters across multiple groups.
- Zoom to determines whether to zoom the map to the extent of the filtered data. By default, the map maintains its current extent.
- Persist After Widget is Closed allows you to persist the filter when the widget is closed.
Use the Group Filter widget
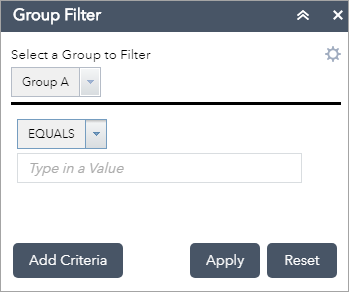
- Click the Group Filter widget to display a selection of predefined filter sets.
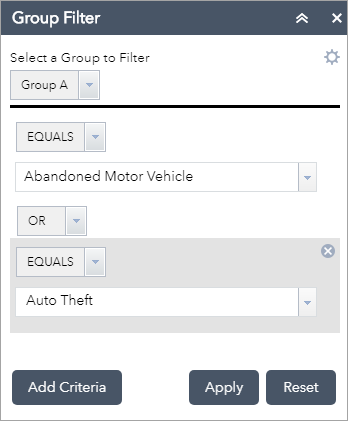
Below the gray line divider are an operator and a drop-down list. In this case, the map is filtered to show only abandoned motor vehicle complaints. Click Apply to execute this setting.

- Click Reset to remove the filter and restore the map to its previous state.
- The widget allows you to add additional filter criteria at run time. Click the Add Criteria button to add another clause. Notice that the two criteria are joined with a conjunction. You can choose to join them using either OR or AND.

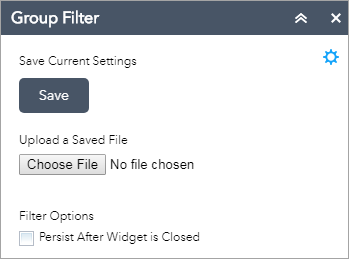
- The widget has a save option to save these defined criteria settings for future use. Click the settings button. The widget panel switches to the options panel.

- Click Save to save the defined criteria locally as a JSON text file.
- Click Upload a Saved File to load a previously saved file to restore all the criteria defined in the file.
- If you need to use the filtered map in other widgets, check Persist After Widget is Closed. By default, closing the widget will revert all filters to the map's initial state.